Correct cycling posture is crucial for power, efficiency, and injury prevention on your bike. This definitive guide covers all the key elements of good bike fit and body positioning for optimal performance.
Introduction to Proper Cycling Posture
Maintaining proper form while cycling may seem trivial, but your on-bike posture impacts everything from speed and stamina to joint strain and low back pain. By optimizing your fit and actively engaging key muscle groups, you can enhance power transfer, achieve a more comfortable position, and reduce overuse injuries.
Importance of Good Posture While Cycling
Unlike running, biking relies less on impact absorption from muscles and joints. With weight supported by the saddle and minimal shock loading, minor postural flaws can be amplified into major performance or comfort issues over longer distances.
Good cycling mechanics rely on an efficient body position to generate momentum and minimize drag. This allows you to ride faster with the same effort, putting less demand on the muscles and cardiovascular system.
A dialed position also prevents excessive strain on vulnerable areas like the neck, knees, low back, and hands. By aligning joints and distributing contact points, you enhance endurance and steering control while lowering injury risk.
Common Cycling Posture Mistakes to Avoid
Many amateur riders prioritize aerodynamics and power over stability and sustainability. Watch out for these all-too-common blunders:
- Excessive forward lean creates neck, shoulder and low back tension
- Gripping handlebars too tightly results in numbness or nerve damage
- Slumping into an unstable position ruins power transfer efficiency
- Overarching low back hyperextends the spine and stresses soft tissues
The ideal pose keeps the body aligned, relaxed, and balanced for fluid pedaling. Let’s break down the key elements below.
Core Body Positioning
A strong engaged core forms the foundation of efficient riding posture. The abdominal muscles stabilize the pelvis to enable optimal force generation through hips and legs.
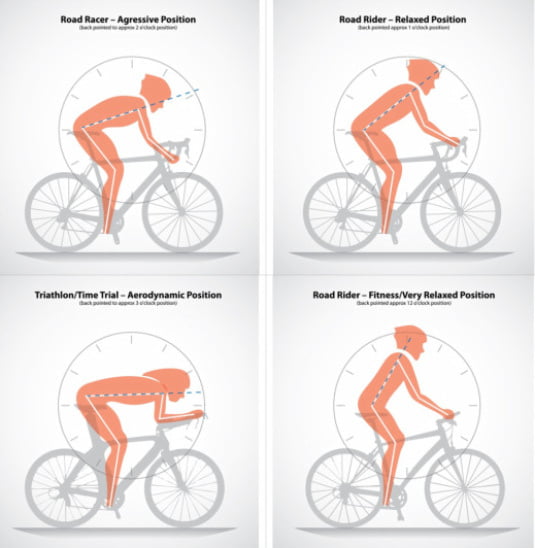
Source: bike.bikegremlin.com
Spine Position and Lower Back Arch
Aim to maintain the spine’s natural curves without rounding or overarching the low back. A neutral pelvis anchored by the core will alleviate hyperextension and strain.
Perform regular core strengthening exercises focusing on transverse abdominis activation rather than just rectus abdominis crunches. This trains the deep stabilizers to keep the abdominals tight.
Shoulder and Neck Positioning
Shoulders should stay low and loose rather than tensed upwards near the ears. Retracting the shoulders slightly while keeping the chest open helps stabilize the upper back.
Chin should be level, eyes looking forward. Avoid jutting the head forward as this strains neck muscles and ligaments over time.
Engaging Core Muscles
Consciously brace the abdominals by inhaling before pulling them in gently towards the spine. Time this with the pedal stroke, engaging at the start of the down phase.
Maintain tension while breathing normally to improve stability, spinal alignment and power transfer.
Hand and Wrist Placement
Optimizing grip technique prevents upper body issues like wrist strain, numb hands or shoulder discomfort. Match this to your preferred riding position based on bike fit.
Hand Placement on the Handlebars
Grip the hoods for technical sections needing fine braking/shifting control. The dropped section behind the brake hoods provides aerodynamic advantages. The tops enable a heads-up view of the road.
Don’t slide hands inward as this misaligns wrists. Weight should be supported through the heels of the hands anchored on the bars.
Wrist Angles and Grip
Aim for straight wrists to minimize pinching nerves or straining tendons with overextension. Cockpit customization like angled stems assists natural positioning.
Grip firmly but without hyperextending joint capsules or risking numbness. Shake hands out periodically to restore circulation. Padded gloves cushion vibrations.
Proper Saddle Height
Dialing in appropriate saddle height is crucial for maximizing pedaling efficiency while protecting vulnerable knee joints.
Finding Your Ideal Saddle Height
As a starting point, adjust height to create a 25°-30° knee bend at bottom of pedal stroke with heel on the pedal. The knee should never fully lock out.
Sit on the saddle and place heels on pedals. The leg should fully extend with just a slight bend. Repeat test by pedaling backwards.
Fine tune height based on pedaling smoothness/comfort over 10-15 minutes. Avoid drastic changes which could irritate joints/soft tissues.
Thigh and Knee Positioning
Knee tracking should follow a vertical path aligned over and behind the toes without lateral deviation. Misalignments strain ligaments.
Maintaining this trajectory requires properly positioned saddles and cleats. Seek professional bike fits to address knee issues. Targeted strengthening exercises also help.
Adjusting Saddle to Suit Your Height
Within adjustment limits, start higher for inflexibility/joint protection and lower for power optimization. The ideal setting enables fluid pedaling without overextending.
Account for cycling discipline too – mountain bikers may run slightly lower for better downhill handling while road cyclists stay higher for endurance.
Saddle Position
The saddle fore/aft position significantly impacts comfort, power and handling. As flexibility and riding style varies greatly between individuals, experiment to get this dialed.
Saddle Fore/Aft Position
Knee placement in relation to the pedal axle determines ideal fore/aft saddle position. Knees should be vertically above or slightly behind the pedal axle when cranked to 3 o’clock/9 o’clock.
As flexibility improves, sliding the saddle minimally forward can increase power. But avoid positioning too far forward which strains knees and reduces stability.
Reaching Handlebars Comfortably
Adjust saddle forward or back incrementally until you can comfortably reach handlebar grip positions without overextending the back or feeling cramped.
Maintain a gentle forward curve rather than rounded back. Elongate the spine by envisioning crown of head reaching upwards.
Weight Distribution on Saddle
Evenly distribute weight between sit bones rather than rolling hips back. Soft tissue pressure can irritate nerves or blood vessels.
Periodically rise off the saddle over bumpy sections by engaging core and hovering hips above the seat to reduce jarring.
Pedal Stroke and Foot Position
Proper foot positioning maximizes power delivery into each pedal stroke while preventing knee tracking issues.
Ball of Foot Placed on Pedals
Place the ball of each foot over the pedal spindle rather than mashing down through the arch. This anchors the foot securely.
Rigid soled cycling shoes transfer force efficiently. Clipless pedals enhance connection but take care with release tension to avoid knee injury if unclipping fails.
Pedal Stroke Efficiency
Focus on smooth circular turning of legs rather than just mashing down. Engage hamstrings and glutes to pull pedals upward as well.
Unweighting the recovering leg enables easier repositioning for the next power phase. Pedaling should feel controlled rather than forced.
Cleat Positioning and Adjustment
Incorrect cleat angle or excessive float range can upset knee tracking. Seek professional bike fits and physiotherapy to align rotation and angle appropriately.
Start with neutral then adjust incrementally within guidelines. Knees must track vertically without lateral deviation throughout pedal stroke.
Handlebar Height and Reach
Handlebar position impacts back health and sustainable power output as much as saddle height. Neck strain, hand numbness and core fatigue result from poor adjustment.
Handlebar Height for Road Bikes vs MTBs
Road cyclists often prefer lower positions for aerodynamic efficiency while mountain bikers run higher placements enabling better handling control on variable terrain.
Bar height depends on the head tube length and spacer setup. Stems enable further customization – go shorter for responsiveness or longer for stretch.
Back Sweep and Drop for Road Bikes
Greater handlebar backsweep reduces strain on hands and shoulders in lower aggressive positions. Similarly opting for shallower drop may suit flexibility limits.
However lowering stack height too much hampers road visibility and requires tighter core tension to support the heavily bent position. Go easier on long endurance rides.
Gripping the Hoods vs Drops vs Tops
Vary hand placements between the anatomical drops, aero horns and upright tops to alleviate numbness and distribute pressure. Don’t overgrip bars – stay light through the fingers.
Hoods provide most control while drops attack headwinds efficiently. Get comfortable riding in varied positions based on conditions and body feedback.
Head and Helmet Position
Proper head alignment and a well-fitted helmet improve comfort, aerodynamics and sightlines essential for road awareness.
Level Head Positioning
Aim for a flat neutral head position avoiding major tilting up or down. Chin should not jut forward but stay aligned with the chest.
Limit downward gaze to minimize neck hunching. Scan farther ahead on the road to enable proactive responses at higher intensities.
Helmet Fit and Adjustment
Helmets should feel snug without creating pressure points. Adjust internal pads and stabilizers to prevent shifting or lift during accelerations/bumps.
Vents should align with the forehead to maximize airflow. Straps should meet just below the ears allowing the helmet to slide slightly forward on impact.
Looking Ahead on the Road
Focus eyes ahead rather than directly down at the front wheel. Scan 10-20 seconds ahead to spot road hazards early and make smooth adjustments.
Practice bike handling skills like looking through corners, over shoulders and briefly behind without swerving to improve safety.
Body Weight Distribution
Balancing weight appropriately enhances bike control, handling precision and ride quality over variable road surfaces.
Even Weight Distribution
Aim equal weight distribution between hands, feet and saddle contact points. Excessive weighting through hands causes numbness while too far back strains the low back.
Actively shift weight distribution based on terrain. Lighten hands for cobblestones but drive weight backward when winching the bars on climbs.
Weight Shifting for Control
Subtly shift body mass for handling bumpy corners or fast switchback turns. Press the inside knee against the top tube while weighting outside foot and handlebar.
Avoid drastic movements which could upset bike stability. Any inputs should be controlled presses not sudden dumps of weight.
Impact on Bike Handling
Loading weight appropriately enables controlled direction changes and increases tire adhesion during turns. Too far forward leads to understeer while too far back causes oversteer.
Practice braking and corning drills to develop a feel for bike’s handling sweet spot. Slight weight shifts fine tune responsiveness.
Relaxed Upper Body
Avoid tensing neck, shoulders or hands while riding as sustained gripping reduces circulation and accelerates muscular fatigue.
Avoiding Tense Shoulders
Consciously drop shoulders down from ears and retract shoulder blades to open chest. Limit time gripping the aerobars to avoid chronic tightness.
Shake out arms periodically and perform targeted stretches focusing on chest and anterior shoulder release. Upper back strengthening also helps offset hunching.
Keeping Elbows Bent
Maintaining a soft bend through elbows enables shoulders to stay low and relaxed rather than rigidly bearing weight in extended positions.
Avoid locking out joints even when hunkered in aggressive postures. Build endurance for low positions gradually accounting for tissue tolerance.
See also: Does Cycling Reduce Upper Body Fat?
Loose Grip on Handlebars
Grip firmly but without creating tension that reduces circulation or nerve gliding function. If hands start to tingle or tire, change hand position.
Fidgeting fingers and shaking the arms out helps push blood back towards fingertips. Notice excessive gripping and actively release.
Engaged Leg Muscles
With the saddle supporting your weight, legs provide the driving force to propel the bike. Keep major muscle groups activated rather than passive.
Preventing Stiff Knees
Avoid mashing big gears as this overloads vulnerable knee joints. Maintain a high pedaling cadence around 80-95 RPM to keep knees moving fluidly.
Let knees track naturally over toes without forcing outward angling. Consistent motion minimizes ligament or tendon irritation.
Using Quadriceps and Hamstrings
Focus on smoothing the pedal stroke rather than just driving down through quads. Engage hamstrings and glutes to pull pedals during recovery phase.
Time contraction and relaxation cycles efficiently so each leg gets a break while the other drives through power phase. No muscle group should fight the cranks.
Pushing Down Through Pedal Stroke
Maximize pedal force application by keeping knees over toes and ankles aligned with hips and shoulders. This centers weight over the bottom bracket.
Scrape mud or snow off shoes to securely grip pedals. Pull up on backstroke as well driving force all the way around stroke.
Breathing Rhythm
Steady breathing technique provides working muscles optimal oxygenation while removing fatigue-inducing waste products like lactic acid.
Steady Breathing Pattern
Strive for rhythmic measured breathing rather than randomly gulping air. Sync inhale/exhale timing with pedal or stride cadence where comfortable.
Avoid holding breath which strains under pressure and allows waste metabolites like carbon dioxide to accumulate. Regular deep breathing flushes these.
Avoiding Holding Breath
Breath holding increases blood pressure and often corresponds with muscular tension. Consciously maintain steady slower paced respiration.
If you notice breath holding or choppy variable patterns, actively focus on smoothing out the cycle. This helps relax the body.
Inhaling On Easier Sections
Time inhales during less demanding sections like descents or tailwinds. Exhale strongly driving up climbs or into headwinds matching greater effort.
Learning to dissociate difficult breathing from the legs’ burning effort enhances cycling endurance and economy. Tame the mind and the body will follow.
Bike Fit and Flexibility
Fine tuning cycling position requires accounting for individual anatomical variation in areas like limb proportions, strength balances and joint mobility.
Professional Bike Fits
Getting professionally fit maps ideal contact point placement to your structure and proportions. This tunes the bike to match your strengths and weaknesses.
Retül, Guru and Specialized Body Geometry systems use motion capture for dynamic measurements during pedaling. Addressing limitations optimizes fit.
Yoga and Stretching for Cyclists
Off-bike mobility/flexibility training helps sustain optimal positioning for longer durations. Hip flexors, hamstrings and thoracic spine are common problem areas.
Poses like pigeon pose, bridge and cat/cow mobilize tight tissues while building core/spine strength crucial for stability.
Core Strength and Endurance
The entire midsection including deep and superficial muscles keeps the body balanced on the bike. Go beyond sit-ups to train whole core using planks, bird dogs and dead bugs.
A strong trunk resists fatigue better for miles without efficiency losses or strain to the low back, shoulders and neck.
Adjusting Your Position
Adjust fit on longer rides to alleviate excessive strain as fatigue sets in. Make small tweaks within proper form guidelines.
Here is the continuation of the article on correct cycling posture:
Accommodating Fatigue
As the body tires, your position deteriorates. Counteract slumping by engaging core and resetting posture. Move elbow pads wider or lower seat slightly.
Open chest by pinching shoulder blades back while dropping shoulders down from ears. Relax death grip on handlebars and shake out hands. Remind tense areas to soften.
Changing Hand Positions
Shift palm placements more frequently with onset of fatigue. Rotate from tops to hoods to drops to change contact stress and alleviate numbness.
Light hands loosely grip bars without bear claw tension which tenses shoulders and reduces circulation. Fidget fingers to push fresh blood back in.
Getting Out of Saddle
Standing intermittently alleviates saddle pressure providing relief to soft tissues and a chance to reset posture. Engage core before lifting out of saddle.
Stretch hips by gently swaying bike side to side focusing on leg isolation not upper body rotation. Keep shoulders low as you climb back into the seated position.
Maintaining Proper Form
Vigilantly monitor your position throughout rides. Reset form frequently before poor habits cement and impact performance or comfort.
Resetting Your Posture
Use visual landmarks like cracks in the road or mile markers to remind yourself to scan posture and correct flaws. Set phone alerts if needed.
Focus on elongating the spine by lifting the crown of the head towards sky. Soften death grip, relax shoulders and check low back arch.
Reminders and Cues
Place adjustable seat post markers or handlebar tape alignments indicating optimal heights. Have a friend yell out occasional “posture check!” reminders on group rides.
Over time build proprioceptive awareness and efficiency corrections become automatic without conscious thought interrupting rhythm.
Riding Efficiency
With a balanced dialed position, riding at tempo effort should feel smooth and sustainable not ragged or forced. Burning should build slowly not spike prematurely.
If struggling early despite perceived easy pace, flawed technique or position misalignment is likely loading muscles unevenly creating strain.
Benefits of Good Posture
Optimizing on-bike form pays dividends including enhanced athletic capacity, injury resilience and comfort over long miles.
Power Efficiency
Correct posture reduces unnecessary tension and misalignments wasting energy. This converts more effort directly into forward momentum extending range and speed capacity.
By supporting natural joint tracking, coordinated movements minimize wasted motion. Smooth circles conserve momentum leading to an easier perceived effort.
Injury Prevention
Neutral spine and joint positioning reduces abnormal tissue loading and repetitive strain that causes overuse syndromes. This greatly cuts the risk of chronic back or knee pain.
Stable balanced form prevents sudden weight shifts or loss of control leading to acute trauma from crashes or mishandled bumps/turns.
Comfort on Long Rides
Efficient sustainable posture enables logging long weekend mileage or tackling multi-day tours in greater comfort. This reduces premature fatigue allowing you to see more terrain.
By minimizing joint discomfort and avoiding numb hands, foot or back pain, the joy of riding endures over the distance rather than being cut short by physical protest.
Common Postural Imbalances
Many riders develop chronic strength and mobility imbalances leading to poor movement patterns. Correcting these helps sustain efficient posture.
Rounded Shoulders
Shoulder protraction from prolonged gripping and mid-back hunching causes the chest to concave inwards and head to jut forwards straining the neck.
Forward Head
The head shifts anteriorly in response to low handlebars and/or computer monitor gaze. Text neck shortens suboccipital muscles compromising posture.
Uneven Hips
Leg length discrepancies, ankle restrictions and pelvic asymmetries rotate or drop one hip leading to spinal compensations like scoliosis under load.
Exercises for Cyclists
Off-bike training should complement the sport’s demands. These key exercises build endurance and balance strength deficits causing poor mechanics.
Bridge Pose
The bridge checks rounded shoulder and hip tightness by extending the front while opening the chest and hip flexors. Hold end range then pulse up and down in small motions.
Bird Dogs
Bird dogs integrate core stabilization in the horizontal plane while training coordination. Reach opposite arm/leg simultaneously then hold steady without twisting the spine.
Planks
Planks massively strengthen transverse abdominis drawing in the navel towards spine keeping the back flat. Hold static then add slow controlled arm/leg lifts moving one limb at a time.
Stretches for Cyclists
Increase range of motion and rebalance chronically shortened muscles pulling bony structures out of neutral. Prioritize chest, hips and hamstrings.
Chest and Shoulder Stretches
Door frame stretches safely open the anterior chain. Interlace fingers behind back while pinching shoulder blades together to counter forward head/rounded shoulders.
Hip Flexor and Glute Stretches
Low lunges with posterior pelvic tilt target tight iliopsoas from prolonged hip flexion. Figure four lying supine gets into external rotators and glute meds.
Hamstring Stretches
Straight leg hamstring slides reduce stiffness allowing greater hip extension stride length and knee tracking over the foot. Avoid overarching low back.
FAQs on Cycling Posture
What is the correct cycling posture?
The correct cycling posture involves having your back flat, spine neutral, shoulders relaxed, elbows slightly bent, hips level with the seat, and feet parallel to the ground. Keep your abdominal muscles engaged to support your lower back.
What is the correct posture for cycling machine?
The correct posture on a stationary bike or spinning bike involves sitting up straight with a neutral spine. Your seat height should allow for a slight bend in the knee at the bottom of the pedal stroke, with the ball of your foot positioned over the pedal spindle. Hold the handlebars so your upper body weight is supported, not resting heavily on your hands.
How should you sit on a bike posture?
You should sit on a bike with your hips level with or slightly above the height of your saddle. Keep your back flat to maintain proper spinal alignment instead of rounding your shoulders. Your knees should have a slight bend at the bottom of each pedal stroke. Hold the handlebars such that your elbows are bent at 90 degrees.
What is the correct body position on a bike?
The correct body position on a bike has your back flat, abs engaged to support your lower back. Keep your elbows bent and shoulders relaxed as you hold the handlebars. Your hips and knees should bend to allow an efficient pedal stroke where you engage your glutes and hamstrings. Avoid rounding your back or locking your elbows.
How high should my handlebars be?
For proper bike fit and posture, your handlebars should be level with or slightly below your seat height. Having handlebars too low places strain on your back, while handlebars too high can cause shoulder, neck or wrist pain. Aim for a comfortable position where you don’t have to crane or hunch in either direction.
What area of the bike is most often incorrectly positioned?
The seat height is the most often incorrectly positioned area of the bike. Many riders have their seats too low, causing excessive knee bend and strain on the knees. Set your seat height so that your leg is almost fully extended at the bottom of the pedal stroke, with just a slight bend in the knee.
Conclusion
Proper form on a bike requires dialing fit, positioning contact points appropriately and moving through coordinated sequences of muscle activation. By training goodtechnique as thoroughly as cardiovascular endurance and muscular strength, you enhance comfort, efficiency and minimize injury risk – keeping the enjoyment and freedom of riding lasting for decades to come. Use this guide’s posture principles and targeted drills to take your cycling fitness to the next level.