Whether you’re installing a new chain, converting your bike to 1x drivetrain, or simply need to remove some links, knowing how to properly shorten a bike chain is an essential skill for any cyclist. A chain that’s too long can derail and get sucked into your bike’s drivetrain, causing serious damage. A chain that’s too short won’t allow you to shift smoothly through all your gears.
Getting your chain length just right ensures proper operation and extends the life of your drivetrain components. While the process requires specialized tools, with some patience and the right technique, shortening a bike chain is a manageable task for an at-home mechanic.
This comprehensive guide will walk through every step of the chain shortening process.
You’ll learn:
- How to measure your ideal chain length
- What tools are needed to break and rejoin a chain
- Detailed instructions for removing links and reinstalling chain pins
- Tips for avoiding common mistakes
- How to test and fine-tune your chain length
- When it’s advisable to have a shop shorten your chain instead
-Answers to frequently asked questions
So grab your chain tool and let’s get started!
Measuring Your Chain
The first step is figuring out how many links need to be removed to achieve the perfect chain length. This requires finding the ideal distance between your rear derailleur and cassette when the chain is on the largest chainring and smallest cog.
Finding the Largest Sprocket Combination
To measure for chain length, you’ll need to shift your bike into the gear combination that positions your rear derailleur closest to the wheel:
- Shift your front derailleur onto the largest chainring. This is the biggest ring closest to the frame.
- Shift your rear derailleur onto the smallest cog. This is the smallest sprocket furthest from the wheel.
Having your chain on the largest chainring and smallest cog extends the chain as much as possible. This gives you an accurate reference point for measuring.
Positioning the Rear Derailleur
With the chain shifted into the big chainring/small cog combo, the next step is to position the rear derailleur properly:
- Gently pull the rear derailleur body back to remove any slack in the upper section of chain.
- Allow the derailleur to tilt forward into its natural resting angle.
- Do not force the derailleur farther forward than this angle.
The goal is to simulate how the rear derailleur will sit with proper chain tension, without actually being attached to a shortened chain. This neutral derailleur position gives the most accurate measurement.
Measuring Proper Chain Length
Now you can measure from the rear derailleur to rear cog to determine the ideal chain length:
- Find the jockey pulley that sits closest to the cogs when tilted forward at rest. This is usually the upper jockey pulley.
- Place a ruler horizontally from the center of the jockey pulley bolt to the center of the smallest cog.
- The ideal chain length will allow 2 to 3 links of overlap past this measurement.
For example: if your measurement is 12 inches, your chain should be 14 to 15 inches total. This provides the perfect amount of slack when on the smallest cog.
Accounting for Frame Flex
One last factor to account for is flex in the frame and derailleur hanger as power is applied:
- On steel or titanium frames, add 2 extra links.
- On stiff aluminum or carbon frames, add 1 extra link.
This ensures adequate chain length to maintain shifting across all gears, even when pedaling hard.
You now have your target chain length! Time to break out the chain tool.
Tools Needed for Shortening a Chain
Cutting and re-pressing chain pins requires specialized bike tools. Here are the essentials:
Chain Tool
A chain tool is used to push chain pins back out in order to remove links. Then it presses pins back in to reassemble the chain:
- Includes a handle for generating leverage
- Pins align with holes in chain to press pins out and back in
- Requires bench vise to hold chain tool securely
Quick Link/Master Link Pliers
Quick link pliers squeeze and unbend master links so the chain can be disconnected:
- Special design fits onto curved master links
- Allows uninstalling a chain without pressing out pins
- Common on modern 9, 10, 11, and 12 speed chains
Bench Vise
A sturdy bench vise holds the chain tool securely as pins are pressed out/in:
- Heavy steel jaws prevent chain tool from slipping
- Stationary mount allows using full body leverage
- Essential for safely supporting chain tool operation
Chain Lube
Re-lubricating the chain prevents internal wear after links are reconnected.
See also: How to Remove Rust from Cycle?
Rags
For cleaning drivetrain and wiping chain lubricant.
Removing Links with a Chain Tool
Once you’ve measured and acquired the necessary tools, it’s time to break the chain and remove excess links.
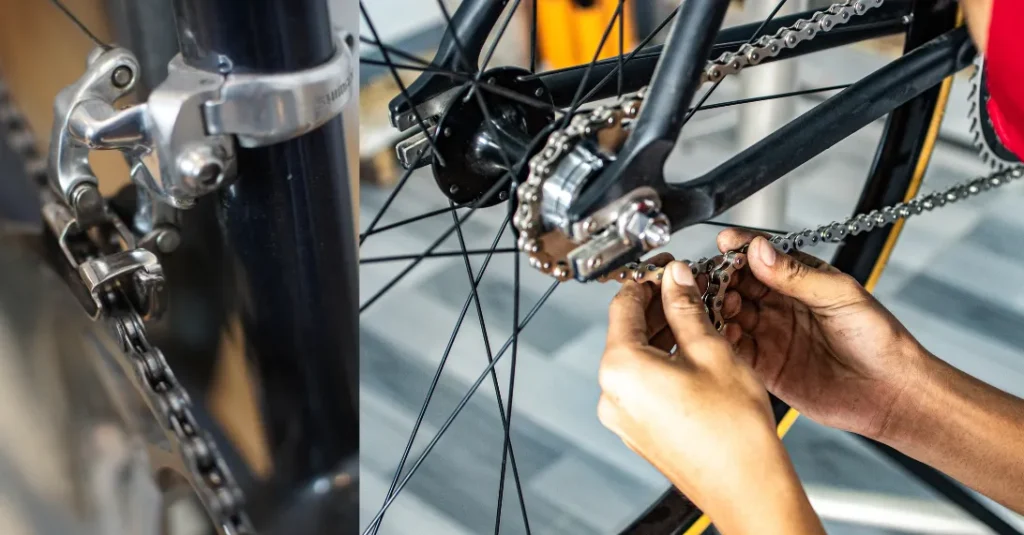
Step 1: Uninstall Chain with Quick Link Pliers
Modern chains have a special quick link that allows the chain to be disconnected without pressing out pins.
- Locate the special quick link connecting the two ends of chain. It will appear different than normal links.
- Position quick link pliers onto the curved plates. Squeeze firmly to bend plates straight.
- Unbend the link just enough so that it can pass through chain rollers and disconnect.
- Set the unbent quick link aside so it can be reinstalled later.
Removing with a quick link avoids having to repin the chain later.
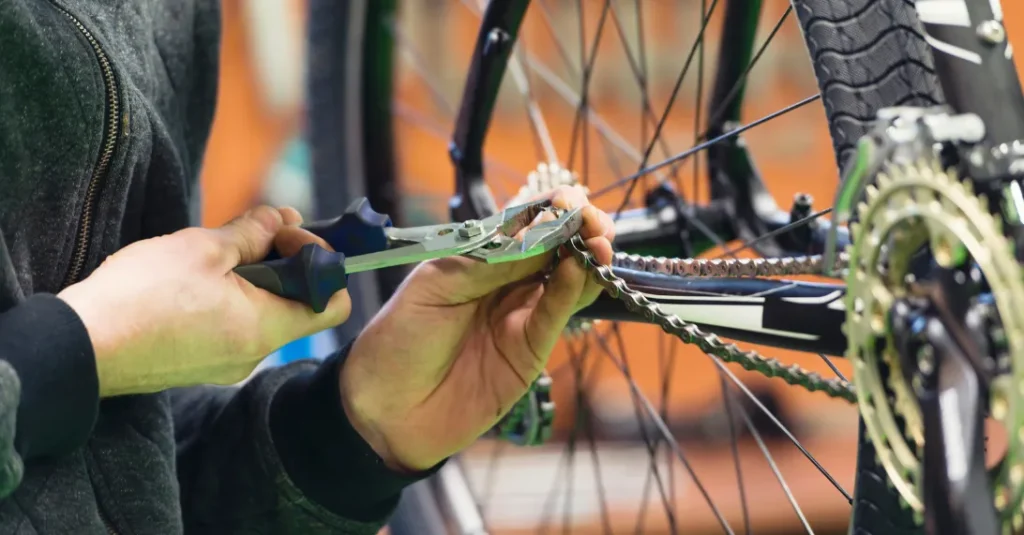
Step 2: Clamp Chain Tool Securely in Vise
The chain tool must be firmly fixed in a vise before pressing out pins:
- Clamp vise jaws tightly onto flat sections of chain tool.
- Position so chain tool handle is accessible and can turn freely.
- Ensure vise is bolted down securely to a sturdy work surface.
This prevents the chain tool from becoming misaligned or slipping while under pressure.
Step 3: Press Pin Out of Chain Link
With the chain tool secured, you can now push the chain pin out:
- Insert chain pin into hole on chain tool aligned with pin you want removed.
- Slowly turn handle to press chain pin through link, forcing it out the other side.
- Push pin completely out until it is disconnected and removed from chain.
Pressing pins out gradually allows them to pass through each chain plate without buckling.
Step 4: Repeat to Remove More Links
To remove additional links:
- Move chain forward to next pin you want disconnected.
- Insert pin into chain tool hole and press it out the same way.
- Collect and set aside any reusable pins that are removed.
Keep going until you’ve removed enough links to match your pre-measured chain length.
Step 5: Reinstall Quick Link
Once excess links are removed, you can rejoin the two ends:
- Take the quick link previously disconnected and insert ends back into chain.
- Position quick link pliers on bent plates and squeeze to make straight again.
- Ensure quick link is fully seated and has locked chain ends together again.
Bending the quick link back and reconnecting restores the continuous loop.
Reinstalling Pins to Finalize Shortening
If your chain doesn’t have a quick link, the final step is to press pins back into the ends of chain:
Step 1: Lubricate Chain and Pins
Before installing pins:
- Apply chain lube thoroughly on inner rollers and plates.
- Lightly lubricate ends of reusable chain pins.
Proper lubrication reduces friction when pins are pressed back through.
Step 2: Align Chain Ends
The open ends of chain must perfectly align to insert pins:
- Grip both loose ends of chain securely in each hand. -Mesh chain ends together so holes are centered and overlap.
- Verify pins will pass smoothly through both inner and outer plates.
Misalignment can break chain plates or bend pins when pressured.
Step 3: Insert Pin and Press Through
With chain ends aligned, insert pin into chain tool:
- Guide tip of pin into first hole of chain end. Apply light pressure to hold in place.
- Carefully begin turning handle of chain tool to press pin through inner plate of first side.
- Continue advancing pin evenly until tip enters second side. Avoid pressing at an angle.
- Press pin completely through until head contacts outer plate.
Go slowly to prevent pin from popping free or bending under force.
Step 4: Inspect Riveting
Inspect both ends to ensure pins are securely riveted:
- Pins should be centered in link holes without any play or looseness.
- Ends of pins should press firmly and flush against outer plates.
- Plates should compress tightly together with no gaps when pin is installed.
If pin feel loose, use chain tool to press further until properly riveted.
Testing and Adjusting Chain Length
Before hitting the trails, check your shortened chain for proper operation:
Shift Through All Gears
Thoroughly shift up and down through every gear combination:
- Shift front derailleur between smallest and largest chainrings.
- Shift rear derailleur through every cog from smallest to largest.
Ensure chain length allows smooth, crisp shifting across full range.
Check Derailleur Movement
Closely watch rear derailleur movement:
- Does the upper pulley stay close but not touch the largest cog when shifted?
- Is there enough play for derailleur to move forward without resistence or becoming overly loose?
These signs indicate ideal chain length for full derailleur movement.
Assess Chain Tension
Pluck lower section of chain to check tension:
- Lower chain should feel only moderately tight, not excessively stiff.
- Adjusting barrel adjuster can fine-tune this tension as needed.
Proper stiffnness prevents chain slap without sacrificing shift performance.
Add Links if Needed
If shifting seems off or derailleur is too tight:
- Press out quick link or pin to disconnect chain again.
- Install one extra link and rejoin.
- Retest shifting and tension until dialed.
It’s easier to shorten more than redo links if cut too short.
See also: How to Tighten Brakes on a Bicycle?
Mistakes to Avoid
Here are some common mistakes to be mindful of:
- Forcing rear derailleur forward of its natural angle when measuring – leads to a chain that’s too short.
- Not pressing pins completely out before reinstalling – can break chain.
- Pressing pins back in at an angle – risks damaging pins, plates, and derailleur.
- Not lubricating sufficiently when installing pins – causes excess friction and wear.
- Forgetting to reinstall quick link properly – allows chain pull apart under force.
Taking it slow and double checking each step avoids these pitfalls.
When to Have a Shop Shorten Your Chain
While shortening a chain is doable for an at-home mechanic, consider letting your local bike shop handle it in certain scenarios:
- You don’t have access to a sturdy vise to securely clamp the chain tool.
- Your chain doesn’t have a reusable quick link.
- Your chain pins have special peening or one-time-use locks.
- You need to shorten multiple chains to match lengths.
Shops have commercial-grade tools and expertise for easier high-volume chain work.
Conclusion
Learning how to properly shorten a bike chain ensures you can carry out this key adjustment at home between drivetrain upgrades. With the right tools, measurements, and technique, removing chain links and pins is a manageable task. Equipping yourself with the skills to re-size chains will save you time and money over the long run.
The steps outlined in this guide will walk you through the entire process from start to finish. Just be patient, double check your work, and don’t be afraid to add links back in if needed. And remember – when in doubt, leave it to your local bike shop. They have the expertise to quickly perfect your chain length.
Now grab your gear, lubricant and chain tool and start practicing this essential bike maintenance skill! With some hands-on experience, you’ll be shortening chains like a pro mechanic.
Frequently Asked Questions
Here are answers to some common questions about shortening a bike chain:
Can I reuse a chain pin after pressing it out?
In most cases, yes. Chain pins are designed to be reusable unless they have special one-time locking features. Just be sure to lubricate pins before pressing them back through. Reusing pins saves money over buying new pins every time.
How do I know which links to remove?
Finding the chain’s shortest usable length while on the big chainring/small cog gives the reference point for removing links. Count the number of overlapping links beyond this length that need to be removed. Marking the first pin needing removal with a marker helps keep track while pressing them out.
What happens if my chain is too short after removing links?
If after testing the chain, shifting performance is compromised, you’ll need to break the chain again and replace one or more links. This is why it’s smart to initially err on the side of removing fewer links. Getting perfect shift performance takes some trial and error.
Can I reuse a quick link more than once?
It’s best to use a fresh quick link each time you install a chain. Reusing a quick link runs the risk of it failing under load due to metal fatigue. Quick links are relatively inexpensive and worth replacing.
How often do I need to shorten my chain?
Most chains will need shortening every few drivetrain replacements when adding new cassettes and chainrings. Swapping cranksets or rear derailleurs often requires shortening the chain to fit properly again. It’s a good idea to shorten a new chain before the initial installation.