Mountain biking has exploded in popularity in recent years. As the sport has grown, so too have the variety of mountain bikes and accessories available to enthusiasts. One accessory that has become quite common is pegs for mounting on the front and rear axles. But this leads to an important question – can you put pegs on a mountain bike?
The short answer is yes, you can install pegs on a mountain bike. However, there are some important considerations to keep in mind before doing so. In this comprehensive guide, we’ll cover everything you need to know about putting pegs on a mountain bike, including:
- What are pegs and why are they used
- Benefits and drawbacks of pegs on mountain bikes
- Wheel/frame compatibility considerations
- How to install pegs on a mountain bike
- Riding tips and precautions with pegs
- Peg materials and sizing
By the end of this guide, you’ll have all the information you need to decide if installing pegs makes sense for your mountain bike and riding style. Let’s get started!
What Are Pegs and Why Are They Used?
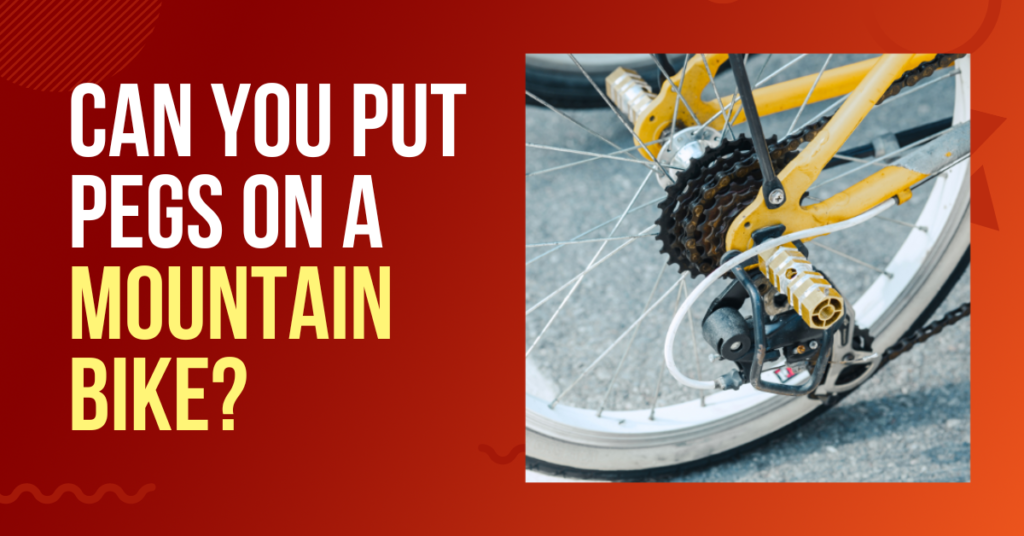
Pegs are metal cylinders that are mounted on the front and rear axles of a bike. They provide a stable platform to perform various tricks and stunts. Pegs originally became popular within BMX and freestyle communities, enabling riders to perform grinding, stalling, and boardslide maneuvers.
More recently, pegs have been adopted by some mountain bike and dirt jump riders looking to bring these freestyle elements to off-road riding. Common mountain bike peg tricks include:
- Grinds: Sliding or “grinding” the pegs along rails, curbs, and other surfaces.
- Stalls: Balancing on just the rear or front peg while coming to a stop.
- Boardslides: Riding parallel to a ledge or rail and sliding the pegs along it.
- Gaps/coasters: Using the pegs to lock into a back wheel coaster position.
In short, pegs provide a stable platform for riders to perform tricks, ride on various surfaces, and showcase their bike control skills.
See also: What States Can You Get a DUI on a Bicycle?
Benefits and Drawbacks of Pegs for Mountain Biking
Adding pegs to your mountain bike can be fun and open up new riding possibilities. But there are also some downsides to keep in mind:
Benefits
- Enable grind, stall, boardslide, and other freestyle tricks
- Provide platform for foot jam tailwhips and coasters
- Allow sliding on rails, ledges, and other surfaces
- Extra mounting points for components (e.g. bash guard)
- Look cool!
Drawbacks
- Add weight to the wheels
- Can catch on objects and cause crashes
- Limit ground clearance for technical terrain
- Reduce wheel/frame lifespan from grinding damage
- Generally not designed for rugged mountain bike use
- Require compatible hubs and frames
As you can see, pegs come with both advantages and disadvantages. Riders need to carefully consider if the pros outweigh the cons for their particular riding style and bike setup.
Wheel and Frame Compatibility Considerations
Not all mountain bike wheels and frames are optimized for the additional forces and wear from pegs. Here are some key compatibility considerations if you’re thinking about installing pegs:
Wheels
- Hub type: Pegs are only compatible with cassette hubs, not freewheel hubs. Cassette hubs are more durable and can better handle peg forces.
- Axle type: QR axles may not be strong enough for peg loads. Thru axles are recommended for maximum durability.
- Rim and spoke strength: Extra stress from jumps, stalls, and grinding can damage lightweight rims and spokes not designed for these forces.
- Disc mounts: Pegs could potentially interfere with disc brake caliper mounts on some hubs. Make sure there’s clearance.
Frame
- Rear dropouts: Dropouts need to have enough horizontal space to accommodate pegs. Boost spaced frames provide more room.
- Chainstay length/tire clearance: Longer chainstays and ample tire clearance are needed so pegs don’t strike the frame or tire.
- Frame material: Steel or aluminum frames can better handle peg forces and grinding wear than lightweight carbon fiber frames.
- Frame/peg mounts: Some frames have dedicated peg mounts already. Otherwise frame protection/modification may be needed.
Considering these factors will help ensure your wheels and frame can safely accommodate pegs. Check with manufacturers if unsure.
See also: What is 26T in Cycle? – A Comprehensive Guide
How to Install Pegs on a Mountain Bike
Putting pegs on a mountain bike takes some mechanical skill. Here is an overview of the installation process:
Tools/Parts Needed
- Pegs designed for your axle size
- Peg mounting hardware (bolts, washers, etc.)
- Bike work stand
- Hex wrenches
- Grease
Installation Steps
- Degrease and clean the hub axles where pegs will mount.
- Apply a thin layer of grease to the peg mounting surfaces.
- Insert the peg bolts through the peg and axle, adding washers as needed.
- Tighten bolts to hub/peg manufacturer specifications, usually around 30-40 ft-lbs torque.
- Perform a quick spin test to ensure proper clearance and no binding.
- (Optional) Use additional frame protection if needed to prevent peg grinding damage.
And that’s the basic process for installing pegs on your mountain bike! Be sure to closely follow manufacturer guidance for your specific hub and peg models.
Riding Tips and Precautions with Mountain Bike Pegs
Riding with pegs takes some adaptation and skill development. Here are some key tips for safely using your mountain bike pegs:
- Start slowly and master basic grinds/stalls before moving to advanced tricks. Overextending your abilities can lead to crashes and injuries.
- Choose smooth surfaces without big gaps for early peg tricks. Falls are more frequent on uneven terrain.
- Beware of peg strikes on the ground or objects. These can cause sudden stops or ejections.
- Pegs alter bike handling dynamics. Get used to the extra wheel weight and reduced clearance.
- Spin the cranks continuously when grinding to prevent peg/chainring strikes.
- Inspect for looseness or damage after each session. Repair or replace parts as needed.
- Remove pegs before aggressive downhill or technical trail riding where they could snag on terrain.
- Always wear safety gear like a helmet, pads, and gloves in case of falls. Pegs can lead to painful impacts.
With practice and caution, pegs can be a fun addition to trail, dirt jump, or urban mountain biking. But respect their risks and limitations too.
See also: How Long Should I Take Creatine Before Cycling Off?
Peg Materials and Sizing
Pegs come in a variety of shapes, sizes, and materials to suit different bikes and riding styles. Here are some key factors to consider when selecting pegs:
- Length – Typical mountain bike pegs range from 2 to 3.5 inches long. Longer pegs provide a wider platform but increase weight.
- Diameter – Wider diameter pegs offer more support and grinding surface. But slimmer pegs reduce weight and clearance issues.
- Material – Chromoly steel pegs are strong and slide well but are heavy. Aluminum pegs are lighter but can bend easier. Titanium offers the best strength-to-weight ratio.
- Axle mounting – Make sure your pegs match the axle size and type of your hubs (e.g. 10mm QR, 12mm thru-axle, etc.)
- Shape – Pegs come in round and rectangular shapes. Round offers the smoothest grinding, while rectangular provides more edges to lock into.
Shopping for the right peg size and style for your bike and riding takes some research. Talk to fellow riders and check manufacturer specs to dial in your perfect pegs.
Conclusion
Adding pegs to your mountain bike opens up possibilities for new skills and tricks. But there are also drawbacks to consider in terms of bike compatibility, handling, risks, and maintenance. Carefully weigh the pros and cons for your riding style and terrain. Follow proper installation and safety precautions outlined here to help decide if pegs are right for your mountain bike. They provide a fun way to advance your bike control and learn techniques from other cycling disciplines – just take a gradual approach and respect their limitations on rugged mountain bike trails. With the right setup and practice, pegs can expand the possibilities for playful trail and jump lines!
Frequently Asked Questions
Do I need special hubs for pegs on a mountain bike?
Yes, you need a cassette rear hub at minimum to handle the forces from pegs. Cassette hubs are more durable than freewheel hubs. Thru axle hubs are also recommended for extra strength.
What bike types are pegs suitable for?
Hardtail mountain bikes, dirt jumpers, slopestyle, and some dual suspension bikes can potentially accept pegs. Be sure to verify frame and wheel compatibility. Full downhill bikes are not recommended.
How much do pegs weigh?
Peg weights vary based on size and material. But expect around 0.5-1 lb per peg. So a pair would add 1-2 lbs to a bike. Titanium pegs offer the lightest option.
Can I grind rails and concrete ledges on mountain bike pegs?
It’s possible, but keep sessions short to avoid excessive damage to your wheels and pegs. Mountain bike components are not as durable as BMX parts designed for heavy grinding.
Do I need two pegs or can I run just one?
Most tricks require two pegs to balance and stall between front and rear. However, some skilled riders can utilize just a rear peg for certain maneuvers. Beginners should start with two.
How often do I need to replace/service pegs?
Check pegs regularly for loosening or damage. Replacement frequency depends on usage. Expect to service or replace heavily used pegs every 1-2 years at minimum. Inspect hardware and frame protection too.